Wednesday, May 22, 2013


Another Organic way of pest control is applying Neem Oil Emulsion.
Neem Oil Emulsion
For this we need 1 litre of Neem Oil or 1 kg of Neem Cake, this you can get at any shop which sells ayurvedic medicines or  “pacha marunnu kada”(Malayalam). Nowadays they are also available in Supermarkets, I believe.

Neem Cake


Dissolve 60 gm of washing soap as we have done above in around ½  a litre of water. Pour 1 litre of neem oil in the soap solution and mix it nicely with a long spoon or stick. This solution will turn into a milky solution.
This solution can be diluted in 10 times of water. That is 100 ml of this emulsion should be mixed in 1 litre of water and sprayed on the crops.
This is very useful in pests and bugs attacking the leaves of plants. The itching smell of neem oil and soap keeps away the insects.
For applying in Snake Gourd and Bittergourd cultivation, this solution must be diluted 40 times. That is 100 ml of this solution should be diluted with 4 litres of water. 
American mint, Bush mint / Jungli tulasi / Nattapoochedi(Malayalam) Emulsion

The process is same as mentioned above, 60gm of washing soap dissolved in one litre of water should be mixed with one litre of juice of this plants tender leaves and small branches. These are mostly seen on roadsides. We don’t know how effective they are.
This solution should be diluted in 10 times of clean water.
100 ml + 1 litre water
This emulsion is very useful in relieving the sturdy small parasites seen on pea plants.


Tuesday, May 21, 2013


Today we will look into a simple organic way of removing parasites from our plants.

Tobacco Solution
Put some tobacco leaves in around 5 litres of water in a container and keep aside. Grate 150 gm Bar soap (Washing Soap) in water and keep it in another container. Keep the solution for around 24 hours. After 24 hours remove the leaves from the water, see whether the soap is completely dissolved, otherwise just stir it with some spoon and mix both the solutions.
Dilute this solution 7 times that is 100 ml of this solution must be diluted in 700 ml of water. Spray on the affected leaves and plants. Almost all the small pests attacking the plants are relieved in an organic way.


Thulasi Solution
Take around 100g of thulasi and just bash it with hands and keep in a container of water (1 liter) for 24 hours. Then remove the plant from water and and add I ml of of the soap solution mentioned above and spray it on the plants. Very affective on  insescts that damage the plants by eating through their stems, and other caterpillars that eat your plants leaves.


There’s another way too which I have tried and got result, just spray coke straight on the plants. It works on some kind of insects, I have tried and got results on pea plants. Hard to believe just spend 30/- and give it a try.

 Please post your comment. 


Monday, May 20, 2013


As we all know that Biogas typically refers to a gas produced by the breakdown of organic matter in the absence of oxygen,
"Biogas is produced by the anaerobic digestion or fermentation of biodegradable materials such as manure, sewage, municipal waste, green waste, plant material, and crops, Biogas comprises primarily methane (CH4) and carbon dioxide (CO2) and may have small amounts of hydrogen sulphide (H2S), moisture and siloxanes.
The gases methane, hydrogen, and carbon monoxide (CO) can be combusted or oxidized with oxygen. This energy release allows biogas to be used as a fuel"
True but this is the definition of Wikipedia not mine....
The working portion made simple is that by putting all your kitchen wastes and vegetable wastes (avoiding onion peels, lemon, orange waste, egg shells and bones in the meat...and other non degradable objects) in the biogas plant gives you ample energy.
For the starters we use cow dung (around 20 buckets of them) diluted with water (cow dung have millions of small bacterias in them), we have to cultivate these bacteria inside the plant by giving them the waste food, as a result their excreta which I believe is used for cooking. We have to take care in not killing the bacteria by avoiding the above said materials.
After installing your plant you have to wait for 10-15 days to let the gas fill your tank. After that you can connect it to your stove (Specially designed for the Biogas plant, provided with it) as the methane gas is heavier than the LPG, and moreover it’s not in the form of Liquid, so it cannot come out the normal gas stove. Another good part of this gas is there’s no danger in it if it’s left open. Only loss is the gas you loose. 


After you start using your gas plant you will get around 15-20 minutes of gas. For that you have to put around 2 kg of waste and 2 liters of water. (The water you get after washing your rice or left over water of cleansing fish or meat, the water we get after the rice is cooked can also be used don’t use plain water with the waste). In waste you can include leftover vegetables, leftover food, fish or meat waste etc. continue this for two weeks after two weeks slowly increase the waste by half a kg say 2 ½ kg of waste and 2 ½ liters of water. Another two weeks and another increase.
Likewise you can reach a level of 7 kg’s of waste and 7 liters of waste water, upon reaching this we can get a minimum of 3 hour of continuous gas.
At present I am getting 4 hours of gas 1½ hour in the morning, 1½ hours in the noon and another hour in the night. That’s my experience.
One thing you have to keep in mind is never increase the waste suddenly. If you have a party or function in your house or neighbor, you’ll have more waste, I say you store it another closed plastic container. You can also collect the extra waste in the container, allow the waste to decay there for a day and then put the waste, this way of storing-decaying process I have noticed a great speed in converting the waste into gas.
There is an outlet from where the remains of waste put in the plant comes out in the form of slurry. The amount of waste you put in the plant is the same amount of slurry which comes out, that is another reason why you should not put more waste suddenly, this way more bacteria goes out and your remaining bacterias will suffer doing over load of work, which in result will low your production.
This slurry is a great insecticide and fertilizer.
Dilute a quantity of slurry thrice and you can spray it on you plants, a good organic insecticide against pests.
Dilute it twice to water your crop a great organic fertilizer for you plants.


Saturday, May 11, 2013


          There are a number of types of pests which attack our well cared plants, and there are a number of types of pesticides too available in the market for each and every type of pests. It’s easy too, just buy the desired pesticide, dilute it and spray it, see the result in just hours.
          But that is not the practice we are trying to explain here. We are looking for some healthy measure of organic farming, some healthy vegetables grown in our backyard free of poisonous pesticides.
          So now we will look into some of the natural ways to avoid pests and some organic ways to shoo them off and keep our plants healthy.
          There are a type of certain flies that come into our farms when our veggies start to flower for the first time. They can destroy our farm in days. There is a great homemade way of catching these type flies.
Here is how they are made.
·                   1 empty 2 litre plastic bottle
·                   1 banana peel
·                   1 cup sugar
·                  1 cup cider vinegar
          Place the banana peel into the empty 2 litre pop bottle. Using a funnel, add sugar and vinegar. Fill with warm water to where the neck of bottle begins to narrow. Place cap on bottle and shake to dissolve sugar. Hang with a wire around the neck of the bottle in trees around your place. The bottles will attract them inside. They sink and die. When the bottle is filled with flies take down from tree and discard.


There’s one more way of this :
Cut the bottle in two portion’s and use the same solution mentioned above, and hang them on trees or near your plants. (See the diagram) You can use small LED operated with batteries to attract flies which attract towards light.


Thursday, May 9, 2013


Lets look at a simple method of watering I came across last day which is  useful for the plants in hotter regions. This methods are useful in keeping the land moist continuously.
Some of the crops we mentioned above need the soil to be moist all the time for greater productivity. Using the Drip Irrigation Method we can make the land moist, but they are money consuming. In this method you can use used plastic bottle, and without any cost too. We can also help in recycling the plastic bottles in this method.


All you have to do is put holes around the plastic pet and bury the pet near the plant. The pets neck should be out of the ground, so that you can pour water in it. One pet will be necessary if you place this in between two plants. Isn’t it’s a great idea. This is not my idea I just came across on the net and I tried it, and was useful. So, I thought of sharing with you. Give it a try.

Tuesday, May 7, 2013


Spinach


Spinach is a leafy green vegetable that grows best in cool weather. Spinach, like most dark green leafy vegetables, contains vitamins A and C, potassium and folic acids.
Spinach is one of the most satisfying cool-weather crops to grow, producing large yields of vitamin-rich, dark green leaves that are excellent for salads and for cooking. Since both hot weather and long days trigger spinach to bolt (send up a seed stalk) quickly, the secret to success with this crop is to start sowing seeds as soon as possible in spring, to make small, frequent plantings during late spring and summer.
Spinach does best when growing in moist, nitrogen-rich soil. If you have grown peas it will be sufficient for the soil, as pea plants roots make the soil rich in nitrogen. Spinach plants form a deep taproot; for best growth, so, loosen the soil at least 1 foot deep before planting.
Spinach seed doesn’t store well, so buy fresh seeds every year. Sow them ½ inch deep and 2 inches apart in beds or rows. If the weather isn’t extremely cold, seeds will germinate in 5 to 9 days. Spinach produces beautifully in cool fall conditions, but it’s tricky to persuade the seed to germinate in the hot conditions of summer. Sow seeds heavily, because the germination rate drops to about 50 percent in warm weather, and water the seed beds frequently—even twice a day, as we had said before watering helps to cool the soil.
Spinach can be harvested in the cut and come again method of harvesting. Cut individual leaves, starting with the older, outer leaves, and letting the young inner leaves remain and continue growing for a later harvest.
If you cut about an inch above the crown or base of the plant, it is very likely the plant will send out a new flush of leaves.


Monday, May 6, 2013


Eggplants

Soak seeds overnight to encourage germination; sow them ¼ inch deep. 8 to 10 days are required for sprouting. Transplant seedlings to the plant bed already made for them once they reach 3 inches.
Try growing eggplants in raised beds, which heat up quickly in spring. Plants given plenty of room are healthier and more productive, so space them 2½ to 3 feet apart in all directions. Water well, pour 1 to 2 cups of compost tea around each plant, and firm the soil gently. Eggplants are also good for container growing.
Eggplant needs a spot in full sun (at least 6 hours of sun per day) and with good, well-draining soil. Amend the soil with compost before planting. Dig a hole, planting the eggplants 18 to 24 inches apart, and plant at the same depth it was growing in your small containers or disposable glasses  indoors. Water it in well. A week or two after transplanting, give your plants fish emulsion or compost tea.

Eggplant needs plenty of water to produce well, and to produce fruit that isn't bitter. Water regularly, making sure that the plants get at least one inch of water per week. Feed regularly with fish emulsion or compost tea; once a month is good. Keep the area free of weeds, which will compete with your plants try practicing the daily visit in the fields.
Add bonemeal or crushed eggshells to the hole at planting time, maintain even moisture to help plants take up nutrients.

Harvested, I get these amount daily from my 4 plants.....more than enough for my small family.


Friday, May 3, 2013


Peas

Peas are easily grown in the ground or the containers. The only thing is of growing peas is the right time i.e, avoiding the heat of summer. Once the climate gets hot they stop producing. Another important thing is providing them with right amount of water.
Plant peas in mid spring, when the soil is still cool. Most plants grows best in these temperature . Young seedlings even tolerate fast. Peas don’t like very cold or very hot, and waterlogged area. Moreover Bacteria’s present in the pea roots produce most of the nitrogen needed for the soil and plants. One of the ‘challenges’ in pea planting is fighting the insects. There are a lot of small insects affecting these pea plants, but I have range of organic mixtures to treat them. We will look into it later.
To plant peas soak them overnight in water to speed it’s germination. Prepare the soil as we have discussed in earlier posts, and try planting them in early mornings. If you can plant them in separate small containers it’s better. After sprouting, which usually takes around 8-10 days, you can plant them in the ground where you get ample sunlight. Plant them at least two inches apart, to give them ample space to germinate into healthy plants.
When they start to blossom always keep the soil moist, for that you can put a little straw or wood chips at their roots to keep the water from evaporating away.


Lets have a look on the some types of peas :


Long Beans
These are a delicacy in South India. they are very nutrituos and are found in abundant here. Planting them is the same method as we use for other varieties of peas and beans. 
Long Beans I harvested today....more than enough for my small family for today's meal.


Snap Peas : They have edible pods and are ready to harvest when the pod is starting to plump and are delicious in making soups, stews etc.


Snow peas : these are tender edible podded peas. They can be harvested when they are about three inches long and the peas inside them are just beginning to get plump.


A small thing about their harvesting, please use your both hands to pluck them, holding the vine with your one hand and pull the peas out with the other hand, if the wines are damaged it will take another week to get sprouted that will lose valuable time.
Soup peas after they get a tan colour, shell them and sort the good ones out and allow them to dry hard at room temperature. Store them in airtight containers for the next season.


Wednesday, May 1, 2013

if you have time....Please friends leave a comment or two....


Today we will have a look on what kind of veggies you can easily grow in your backyard. We will have a look on each vegetables their varieties their growing habits their adaptations and their harvesting type etc...Beans, Tomatoes, Peas....each one daily.
Tomatoes
Tomatoes come in a large no of varieties. You can grow tomatoes varieties that produce fruit extra early, and there are varieties for every type of climate, including many that are resistant to one or more common tomato diseases. Select the proper one which suits your backyard.
Tomato plants are vines, and they have two basic ways of growing, called determinate and indeterminate. The vines of determinate varieties (sometimes called bush tomatoes) grow only 1 to 3 feet long, and the main stem and side stems produce about three flower clusters each. Once flowers form at the vine tips, the plant stops growing. This means determinate types set fruit over about a two-week period and then stop, which makes them excellent choices for canning. Indeterminate tomatoes have sprawling vines that grow 6 to 20 feet long. Most produce about three flower clusters at every second leaf. They keep growing and producing unless stopped by frost, disease, or lack of nutrients, which means you can keep picking fresh tomatoes the whole season. Pruning is necessary, however, or they will put too much energy into vine production.
Planting
As I had said before it is better to grow your own plants from seeds level, if you want your crops to last other than buying readymade plants from market.
If you want to take advantage of the full range of available cultivars, you'll have to grow tomatoes from seed. Unless you plan to preserve a lot of your crop, 3 to 5 plants per person is usually adequate. Unused seeds are good for 3 years.

Sow seeds ¼ inch deep and 1 inch apart in the plots we have made. Seeds will germinate in about 1 week. Once the seedlings emerge, water regularly. Once a week, feed with compost tea or fish emulsion( about Fish Emulsion how you make at home, I will describe in brief in coming post regarding fertilizers), and discard any weak or sick-looking seedlings. Once the plant start to gain strength, look for any pests or coloring leaves, this shows lack of nutrients. In tomatoes you would need pruning. The sprouts which emerge in between the main stem and small stems, you would have to pluck them out then only your plant will concentrate on gaining strength for better productivity. Otherwise it will just grow and grow without good productivity. There is variety called cherry tomatoes which needs no pruning. You can try that too.
Give them compost once in a week. You can see them flowering in 4-5 weeks.

Monday, April 29, 2013


Today we will look into some more tips.
About watering…. You shold water your plants daily if you area is a hotter…if it’s a humid area then it will be okay if you water on consequent days. The best time to water is usually in the morning, because mornings are cool, without strong winds, this also results in less loss of water as evaporation.  Some people say watering in the evening makes your plant bed damp overnight and are likely to be damaged by fungal or bacterial attack…but my experience is watering in the evening also makes your plants more healthy. This may depend upon the place you live if it’s not too hot in your area it would be better watering in the morning, otherwise it will be good decision to water in the evenings too if you area is hot.
Try watering the roots not the greenery…. as they are easily damaged, or if you monetary side is good and you don’t have ample time to water daily a drip system can work great. Nowadays these are easily available in market and you can install it yourself.
If you could harvest rainwater for your plants that would be great.

As we have said before weeding is most important.  Some use wood chips on the mud floor to reduce the growth of weeds, but this can be costly and you would not like to spend too much on your backyard farm.
If your plants are attacked by pests it may be a sign of some other problems also, you should make sure they are getting enough sunlight, air and nutrients.  If you could practice with different types of plants or crops in your garden it would limit the pets to some extent. If there is a pest attack and you farm has only one kind of crop this will be easy for the pets. A diverse farm help prevent pests, by limiting the amount of one type of plant offered to enemies, and boosting biodiversity.
It is also a good procedure to foster natural predators in your farm like frogs, toads, lizards or birds. Beneficial insects can be your best friends. Some type of bugs are very useful in some particular types of vegetables, that we will discuss in coming posts.
There are a lot of organic weapons that disrupts the digestion of caterpillars and other leaf eaters. You can also use horticultural oils, insecticidal soaps, garlic sprays etc. some of them are readily available in the market. Most of them you can make it by yourself. I will give you a brief description about making effective garlic sprays and other organic pesticides which I have used in my farm and proved useful !
About harvesting …when it’s time for harvesting harvest your crop in equal intervals, like tomatoes harvesting makes them to fruit more and some of them give more new sprouts.  During the harvesting time if you see some sick plants just remove them from your farm as they can make harm to others.

Saturday, April 27, 2013


Some Important Practises

Develop a regular habit of checking your small fields daily for any kind of emerging weeds. These are a nuisance to your hard work. If you catch them young it will save you a lot of work and headache. They are easy to pull up during their sprouting stage. They sprought out daily with great strength as we have put a strong foundation for healthy plant growth.
Just spend a little time say 15 - 20 minutes daily inspecting your plants, this will help you pull out the useless weeds and also look for any type of pest attacks too. Missing a day of spending some minutes in your farm wont’ harm much, but if you are away for more than a week......then I suggest please forget about it. Besides, one of the most interesting part of your daily visit is being surprised by the growth of your plants....you would never believe the climbers progress.
Another important thing is Being Too Organic.
Organic plant’s have their own way of taking care of themselves...but that doesn't give excuses for us to be careless. Even organic plants require pest control and fertilizer. Never neglect these two things. Try using inorganic chemicals. I’ll describe in coming posts how you can create you homemade pesticides briefly.
Slowly you will become an expert on which plants to grow in which season, what are their specialties and what type of organic pesticides they need and which one will thrive this hot summer.
Never over plant your farm. Being overambitious and over planting could lead to unpleasant results.
Like humans plants too need some space to thrive to the climatic conditions, moreover a little space between them slows down the process in the course of a pest attack. You could easily get in between them to volunteer their progress also... if they have ample space. When your plants get mature they need some space to bear their fruits also.
As I have mentioned above some flowers like marigold can be planted in between the vegetables...some of them have the ability to keep out some kind of miscreants.
About the sunlight you need sunlight unfiltered for some vegetables like tomatoes for more time of the day, this will give you a great result.. whereas spinach, lettuce and cabbage prefer shaded sunlight. So plan your farm according to the seeds or crops you prefer to grow.
Thanks for reading friends, see you soon.

Friday, April 26, 2013


Fertilizers..

Fertilizing your crops are as important as watering your plants. As I have mentioned above please don’t use any chemical fertilizers.

Chemical fertilizers are easily available in markets and are easy to use, no tensions on whether they will work or not...they are 100% effective. They are also easily absorbed by plant roots and they give a good harvest too. But the problem is the chemicals which we are afraid are again on our menu, causing a lot of health problems. So, if you could show a little patience and a little hard work it will pay off in a bigger way both in type of health and money too. I mean by making your own fertilizers using household leftovers making your premises clean and hygienic and that too in a cheap way.

Fertilizing too often can ruin your vegetable garden. On the other hand if you don't fertilize enough, your vegetables will wither and die. It's a dilemma faced by many gardeners. If you see vegetable plant leaves starting to yellow, chances are, they need fertilizer.

So let’s start with a simple one - A Compost Pit

Gather all the bio degradable waste materials in your household like leftover food, vegetable wastes, banana skins, unused vegetable leaves, overripe fruits etc. You could use the remains of chicken wastes too if you have, that’ makes a nice manure. Never use non-biodegradable wastes like plastic or other vacant tins etc. Try putting your left over’s in a large dustbin for some days and collect it for this pit.

·        Now select a place in your backyard near to where you suppose to grow your plants so that you don’t have to carry it from one place to other. Dig the pit. Please try to make the pit in a shaded area and save it from the rains.

·        Consider the amount of waste you have and then dig a pit according to it.(For a typical home waste pit you have to dig around 3 to 5 feet deep with a mouth width of around 3 feet in diameter).

·        Put your gathered organic wastes in the pit about 15-20 cm in height, then put a layer of fallen leaves of the same height. After that put a layer of cow dung (if you can’t get this in your neighborhood you could sprinkle lime or calcium or use the EM concentrate). After that put a layer of soil and repeat the process (At least 3 times) until you reach the ground level.

·        Cover the top of you pit with soil for hygienic reasons. This will avoid foul smell and prevent flies hovering over your pit.

·        Allow your pit to decompose your waste materials for about 45 days. After that your compost is ready to use. You could now dig open the pit and take it out little by little and use it for your crops. (Try keeping it dry after you break open I mean save it from rains)

In the mean time when your fertilizer is getting ready make you land and also plant your seeds.

We can make this in an another way with open method above the ground. This method is called Thumboormuzhy method created by Mr. DR FRANCIS XAVIER B.V.Sc & A.H ;M.V.Sc, PhD, ( Professor for Farms of the new Kerala Veterinary & Animal Sciences University. Teacher, Researcher and Extension scientist under various colleges and Research Institutions under Kerala Agricultural University & Veterinary University) which is called Aerobic Composting Method. That I will describe in the future posts.

Thursday, April 25, 2013


Ok, today let’s do with some small information’s in farming. This includes some of my experiences and some of my friends too ...

Sometimes you dig through your moss to get soil....but the soil you get should not be as reproductive as you think. You will have to test your soil thoroughly before planting to see what is it’s deficiencies or requirements are, which is not practical in all conditions when you go with your backyard for a small farm to tend to your household needs. There’s a much more easy way to increase your soils’ productivity using the EM concentrates ,which I have mentioned in the earlier post. For eg, if you are planning to grow tomatoes in your backyard  it’s better to add egg shells to make your soil less acidic. (Two eggshells a plant keeps the plant healthy).

Make sure you till you soil nicely with a hoe or rotor tiller. Never use pesticides as this will slowly kill your plants too. You can mix some compost too in your soil to increase your soil’s productivity. (Here again the EM concentrates can be used to make compost. Other soil friendly procedure of making compost, I’ll describe in the coming posts). After all this hard work your land is almost ready.

Now for your seeds. As I have said before study your area and then select the seeds that you prefer to grow in your backyard. Make it in small quantity if you are a starter...,this will encourage and enthusiase you in many ways.

After selecting your seed plant them indoors or else try to plant them in shade....try using disposable glasses or small containers to give them a good start. Nowadays there are small seed growing trays available in market which you can use to grow seeds, these can be used again and again. But I prefer small containers or disposable glasses, this can be readily available at all times in our homes and can reduce the cost of farming too. (To fill the small containers use compost and your backyard soil in the ratio of 60:40). If each seeds are planted in individual small containers they will have ample minerals, water and space to spread their roots soon. After planting water them two times daily. You can see them sprouting within a day or two.

After the sprouting give them two to three days to get their strength....and then slowly take out from their containers and plant them in the place you have already cleared.

Some important things to remember :

If you want your plants to grow well, remember these tips about what to plant near what, and what to plant away from what.
Here is a small list:
·        Cucumbers don't grow good near fragrant flowers.
·        Plant tomatoes near basil and parsley.
·        Pumpkins and potatoes are never supposed to be planted near each other, because they are sort of the same thing, but you can plant watermelons and pumpkins near each other, just make sure they are not too close to each other or one will choke the other.
·        Do not grow tomatoes near corn, they both like nitrogen, and they will fight over it and you will not get good tomatoes and corn, so I am just telling you now to not plant them near each other.

Another important thing :

Decide how much light and water your crops need :

·        Watermelons need as MUCH sunlight as they can get, and when they are flowering, they need a lot of water too.

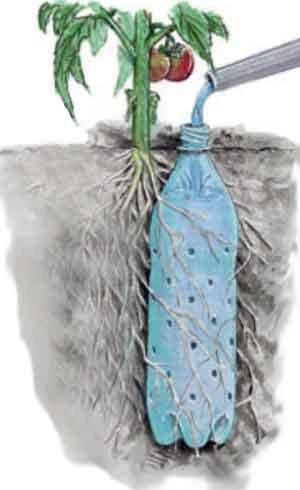
·        Tomatoes need quite a bit of sunlight, still always get as much as you can, and always give them a lot of water. Give them extra support too after flowering, sometimes they can tolerate the weight of their fruits.

·        Corn is a very thirsty plant, as grass is consider corn as a just giant grass, and give it a somewhat large amount of sunlight.

·        Pumpkins need a large amount of water when they have fruit, and they need a lot of sunlight too.

·        Beans need about as much light as tomatoes, but make sure their water is just so the soil is damp to a few inches down (the deeper the water goes, the better but don't make it muddy).

·        Chilies are like beans.

I’ll describe in brief in coming blogs how you can make natural fertilizers and ‘growth tonics’ for your crops, and more over the most important part controlling pest in an organic way. That’s the most important part as that’s where the poison comes in our food mainly.

Wednesday, April 24, 2013


Okay, today  we will have a peek into EM Concentrates.

What’s an EM Concentrate ?

The answer is Effective Micro-Organisms
This is a combination of useful regenerated micro organisms that exist freely  in nature which are not manipulated in any way. The EM solution increases the resistance of soil and plants and also increases the fertility and quality of the soil naturally at the same time improving the growth of plants too.
EM is a liquid concentrate in which the micro organisms are alive but dormant. This is a dark brown liquid with a pleasant vinegary yeast type smell.
EM’s can be used in many possible ways like recycling the waste of kitchen, in agriculture for the easy growth of plants. They can also be used in aquariums too.

Some of the micro organisms present in the EM’s are :
Lactic acid bacteria: these bacteria are differentiated by their powerful sterilising properties. They suppress harmful micro-organisms and encourage quick breakdown of organic substances.

Yeasts: these manufacture anti-microbial and useful substances for plant growth.

Actinomycetes: these suppress harmful fungi and bacteria and can live together with photosynthetic bacteria.

Nowadays EM concentrates  are easily available in markets.

Use 10-20 ml of EM concentrate in 10 liter’s of chlorine free water, (Water can be left open for 24 hours, if your water consists chlorine, it will evaporate during this time). This can be used as a foliar spray in the soil where you plan to grow your crops or plants or any anywhere in poor or stagnant soil, before planting. This will enhance and enrich the soil, which helps the plants in speedy growth, without using any synthetic fertilizers.

EM Concentrates can also be sprayed on biodegradable kitchen wastes and can be converted into high quality manures. The proportion for them also can be the same as mentioned above.